Record Browser
Record Browser is the tool behind almost every screen in Epesi — it's what displays, sorts, filters, and lets you edit any set of records, from Contacts to Tasks to Projects. Learn it once here and you'll recognize it everywhere else in the application.
Browsing records
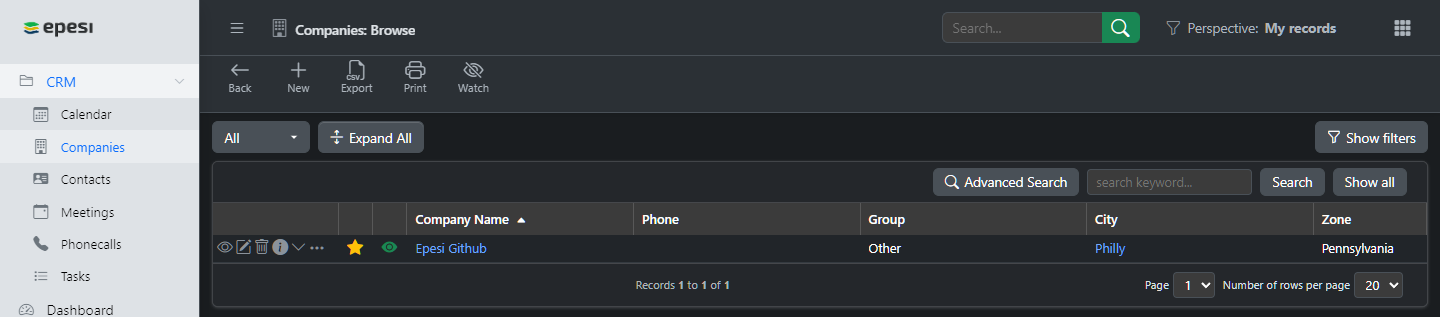
Record Browser's core job is displaying records in a clear, structured list, with sorting and filtering built in. Here's an example browsing Contacts:
-
Label and basic filter — the title on the left names the module or record type you're viewing. The dropdown on the right switches between three basic views: All records, Recent ones, or Favorites.
-
Filters and search tool

- Show filters — reveals filtering options (more on this below).
- Show all — clears every filter and search term, showing all records you have permission to view.
- Simple search — type a word or phrase and click Search.
- Advanced search — for more complex searches, such as one word in a specific field, or several words across several fields (more below).
-
Basic tools — Add new opens a form to create a record. The ABC button opens an alphabetic filter:

Pick a letter (for example, "C") to show only records starting with it. 123 shows records starting with a number, and All clears the filter.
-
Basic functionalities

- Actions — view a record's details, edit it, or hover the info icon for a summary. If you created or own the record, you can also remove it or attach a note. Some record types offer extra actions here — for a Contact, for instance, buttons to create a new task, meeting, or phone call referencing that contact.
- Favorites — a colored star marks a record as one of your favorites. Click the star to toggle it on or off.
- Watching list — a green eye means you're watching the record and you're caught up; a red eye means you're watching it but there are changes you haven't seen yet (hover to see what changed); a grey eye means you're not watching it. Click a green or red eye to stop watching, or a grey eye to start.
-
Records

This is the data itself. The blue column labels (for example, "Last Name" or "First Name") tell you what each column holds, and doubling as sort controls — click one to sort by that column, and click again to flip between ascending and descending order.
Ascending:

Descending:

-
Navigation

- which records are currently displayed
- Next/Last buttons (plus First/Prev once you're past the first page)
- a page-number selector to jump straight to a page
- a records-per-page selector — more records per page means fewer pages
Record details
The exact layout of a record's detail view depends on its type, but a few interface elements are shared across all of them. Here's a Company record used as an example:

-
Module name — shows which module or record type you're viewing. Click the arrow to jump directly to a record by ID.
-
Actions

Hover any icon for a tooltip explaining what it does:
- watching — a green or grey eye, showing whether you're watching this record.
- favorites — shows whether the record is one of your favorites.
- basic info — hover for details about the record's creation and edits.
- copy — opens a window with the record's key values, which you can copy via the Copy button or a keyboard shortcut.
- history — shows every change made to the record. Grayed out if there's no history yet.
- quick-create buttons — vary by record type; typically create a new event, task, or phone call linked to this record.
- new note — adds a note to the record.
-
Main area

The record's actual data. Fields with a blue background label the field name; the field's value sits in the white area next to it. A red asterisk (*) marks a required field.
-
Addons
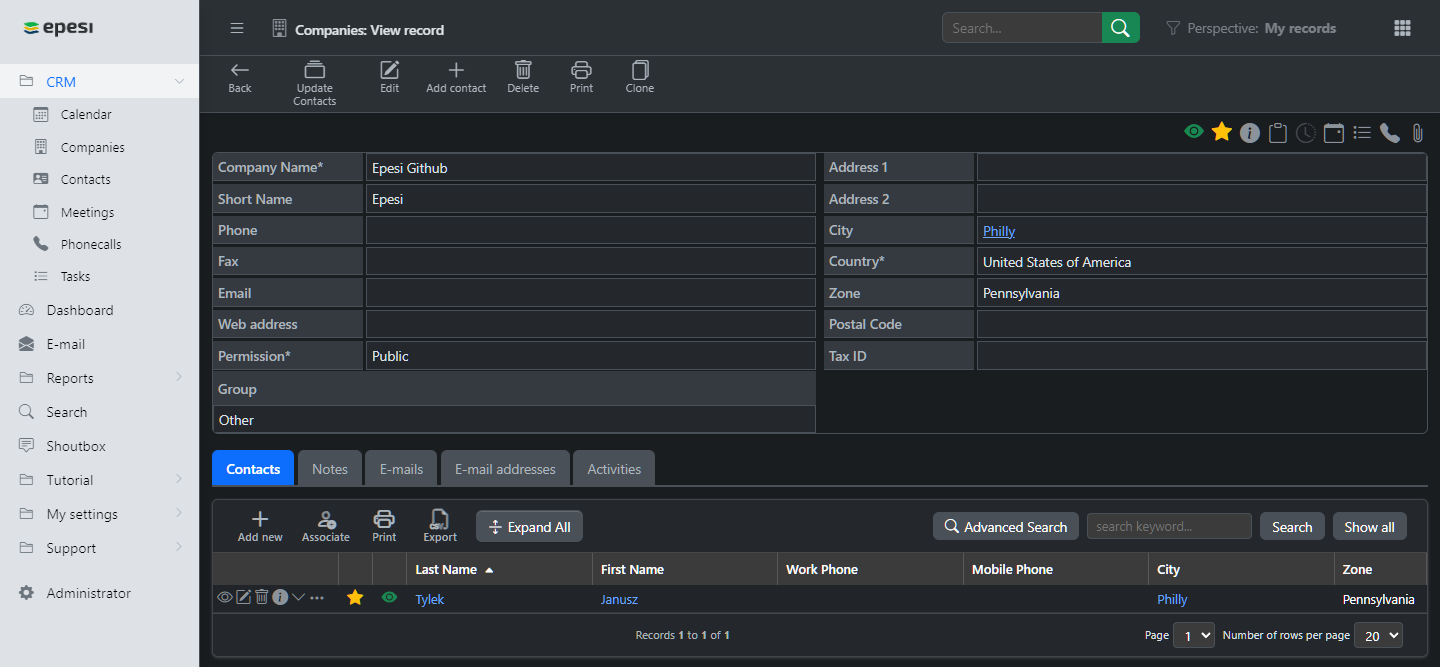
Below the main area, addons show related information — for a company, this might include its contacts, notes, activities, and linked e-mails. What's available depends on the record type; see that module's own page in this manual for details.
Recent and favorite records

Not every record matters to every user, so Record Browser lets you narrow the list to just the ones you care about. Use the basic filter dropdown next to the module title (shown here for Companies) to pick from All, Recent, Favorites, or Watched. All shows everything you have access to; Recent shows what you've looked at lately (usually your last 15, though this varies by module); Favorites shows only records you've starred. Most modules support favorites — a few, like Phone Calls, don't.

Where favorites are supported, a star column appears while browsing: yellow means the record is a favorite (and will show up under the Favorites filter); gray means it isn't. Click either to toggle it — the same star also appears in the top-right of the record's detail view and works the same way there.
Watchdog

Watchdog lets you track changes on records you care about. Once you start watching a record, you're notified of every change made to it — and for some record types, of related records created against it too. Watching a contact, for example, also notifies you about new tasks, meetings, or calls linked to them, as long as you have access to those.
The most convenient way to review tracked changes is the dedicated Watchdog dashboard applet, but you can also see watch status directly in Record Browser. While browsing, look for the eye-colored column: grey means you're not watching, green means you're watching and caught up, red means you're watching and there are unseen changes (hover for details). Click a red or green eye to stop watching; click a grey eye to start. The same eye icon appears in a record's detail view, in the top-right actions panel, and works the same way. See Watchdog for the full picture.
Filters
Filters narrow the record list down to only the ones matching criteria you choose.

Click Show filters, in the top-right of the browsing area, to reveal the filter fields — the button becomes Hide filters so you can collapse them again.

Which fields you can filter by depends on the record type — for Contacts, for example, you might filter by Company name or Group. Set the values you want, then click Show.
Search
Use Record Browser's search to find records containing a specific word, phrase, or set of characters in any field.

The search tools sit in the top-right of the browsing area. For a single keyword or phrase, type it into the search keyword... field and click Search — Epesi returns every record containing it in any field. For anything more targeted, click Advanced Search to reveal per-field search boxes.
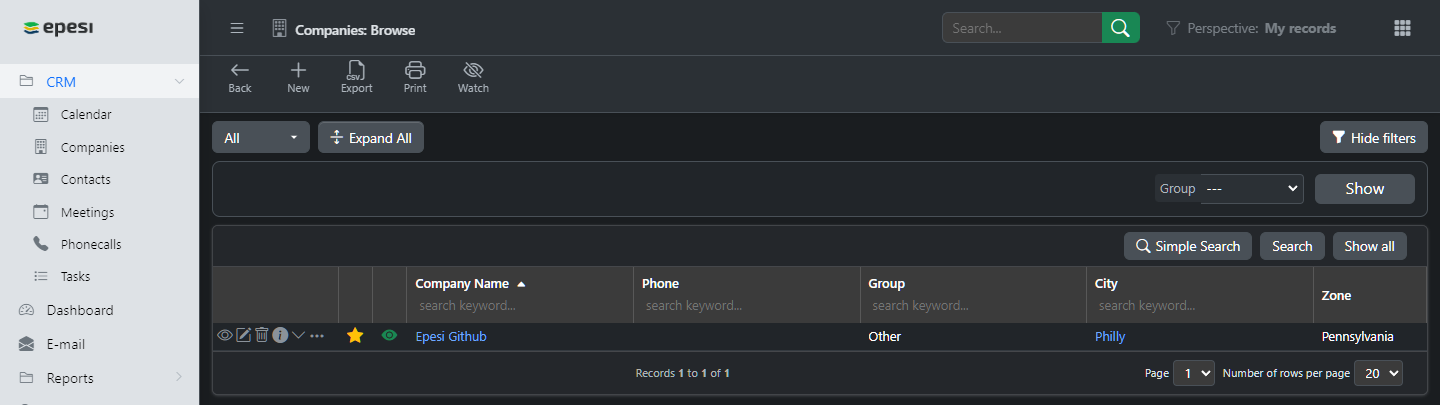
Advanced search lets you search for specific values in specific fields — fill in the fields you want to match and click Search. (A few fields may not be searchable.) Click Simple Search to switch back.
Notes
Every record can have notes attached, so you can keep anything that doesn't fit a record's own fields — a comment, a linked document, background context — attached to the right place. Notes show up under a record's main area, alongside its other addons.
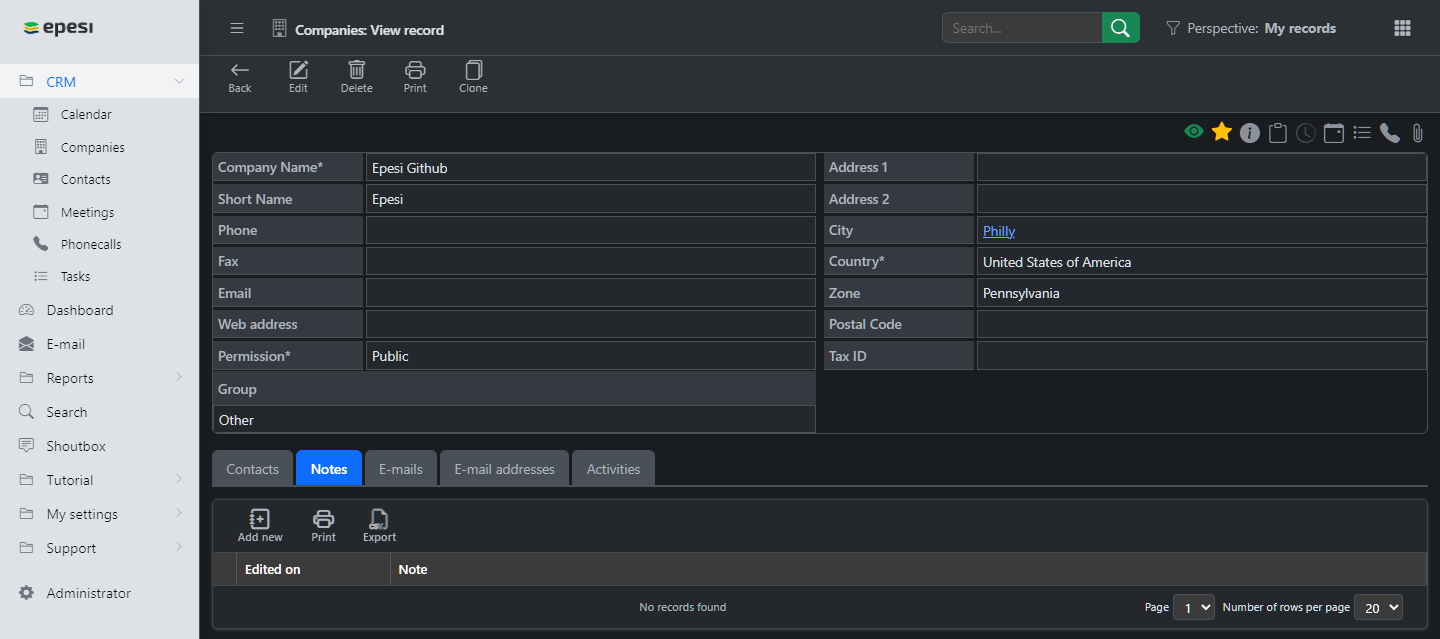
- Notes addon — click to view the notes attached to this record. Shown in blue when you're already viewing it.
- Filters — narrow the notes list by date range, the user who created it, or deleted status (not always available), or search by keyword. Enter your criteria and click Filter.
- New note — adds a note to the record.
- Expand all — toggles every note between expanded (fully visible) and collapsed.
- Actions — from left to right: view, edit, delete, history, copy, cut, expand/collapse (where applicable), and info (hover for a tooltip).
- Sticky — marks a note to always appear above non-sticky notes.
- Attachment — indicates the note has a file attached; click to open it.
User settings
Most of Record Browser's behavior is configurable, split into two categories — Browsing tables and Browsing records — both reachable from the control panel.
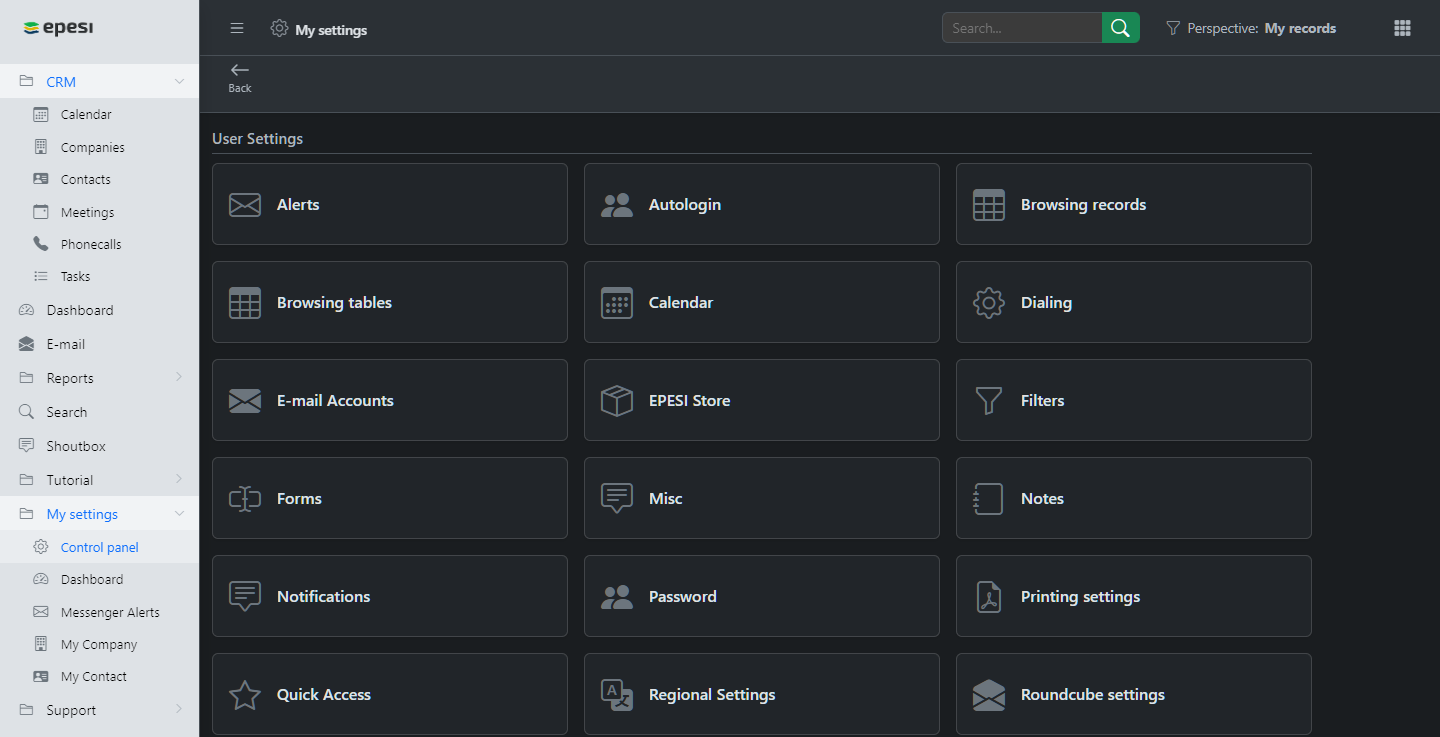
Go to Menu → My Settings → Control Panel to reach both. Browsing tables covers general settings shared across every module, like records per page; Browsing records covers how individual record types are displayed.
Both categories are managed the same way — after opening one, the action bar gives you:

- Back — leaves without saving changes, returning to the control panel.
- Save — saves your changes and returns to the control panel.
- Restore — resets fields to their defaults, but doesn't save; you still need Save to confirm, or Back to cancel.
Browsing tables

General settings that apply across every module — table appearance, searching, and sorting.
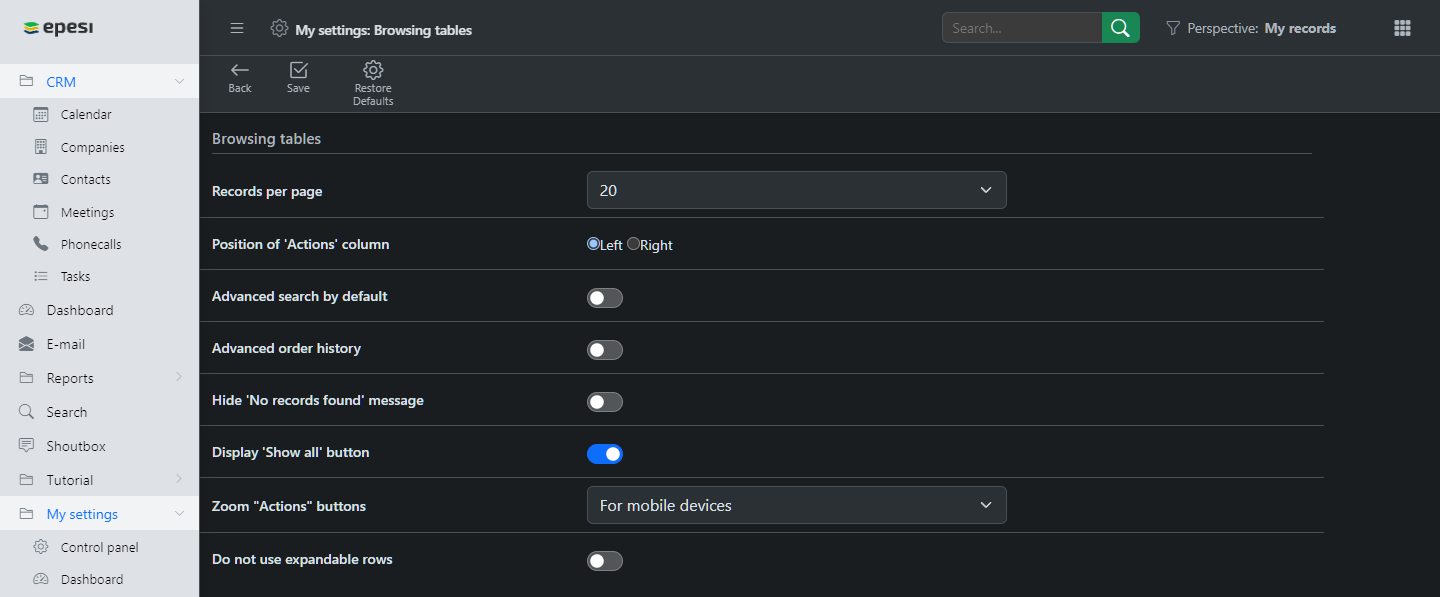
- Records per page — how many records show per page before Epesi splits the list across multiple pages. Options: 5, 10, 15, 20, 25, 30, 40, 50. You can also change this while browsing, from the selector in the bottom-right.
- Position of "Actions" column — defaults to the left; switch to Right to move it to the other side of the table.
- Advanced search by default — whether browsing starts in advanced search mode. Leave unchecked to start with simple search; you can always switch modes while browsing.
- Advanced order history — shows more detail about the current sort order, displayed below the records table.
- Hide "No records found" message — suppresses that message when a search or filter returns nothing.
- Display "Show all" button — adds a one-click way to reset all search/filter options, next to the Search button. Without it, you can still clear filters manually.
- Zoom "actions" button — controls when action icons need a tap to zoom in before you can click them — useful on touchscreens, optional elsewhere.
Browsing records

Per-record-type settings, plus a few options around creating and editing records.
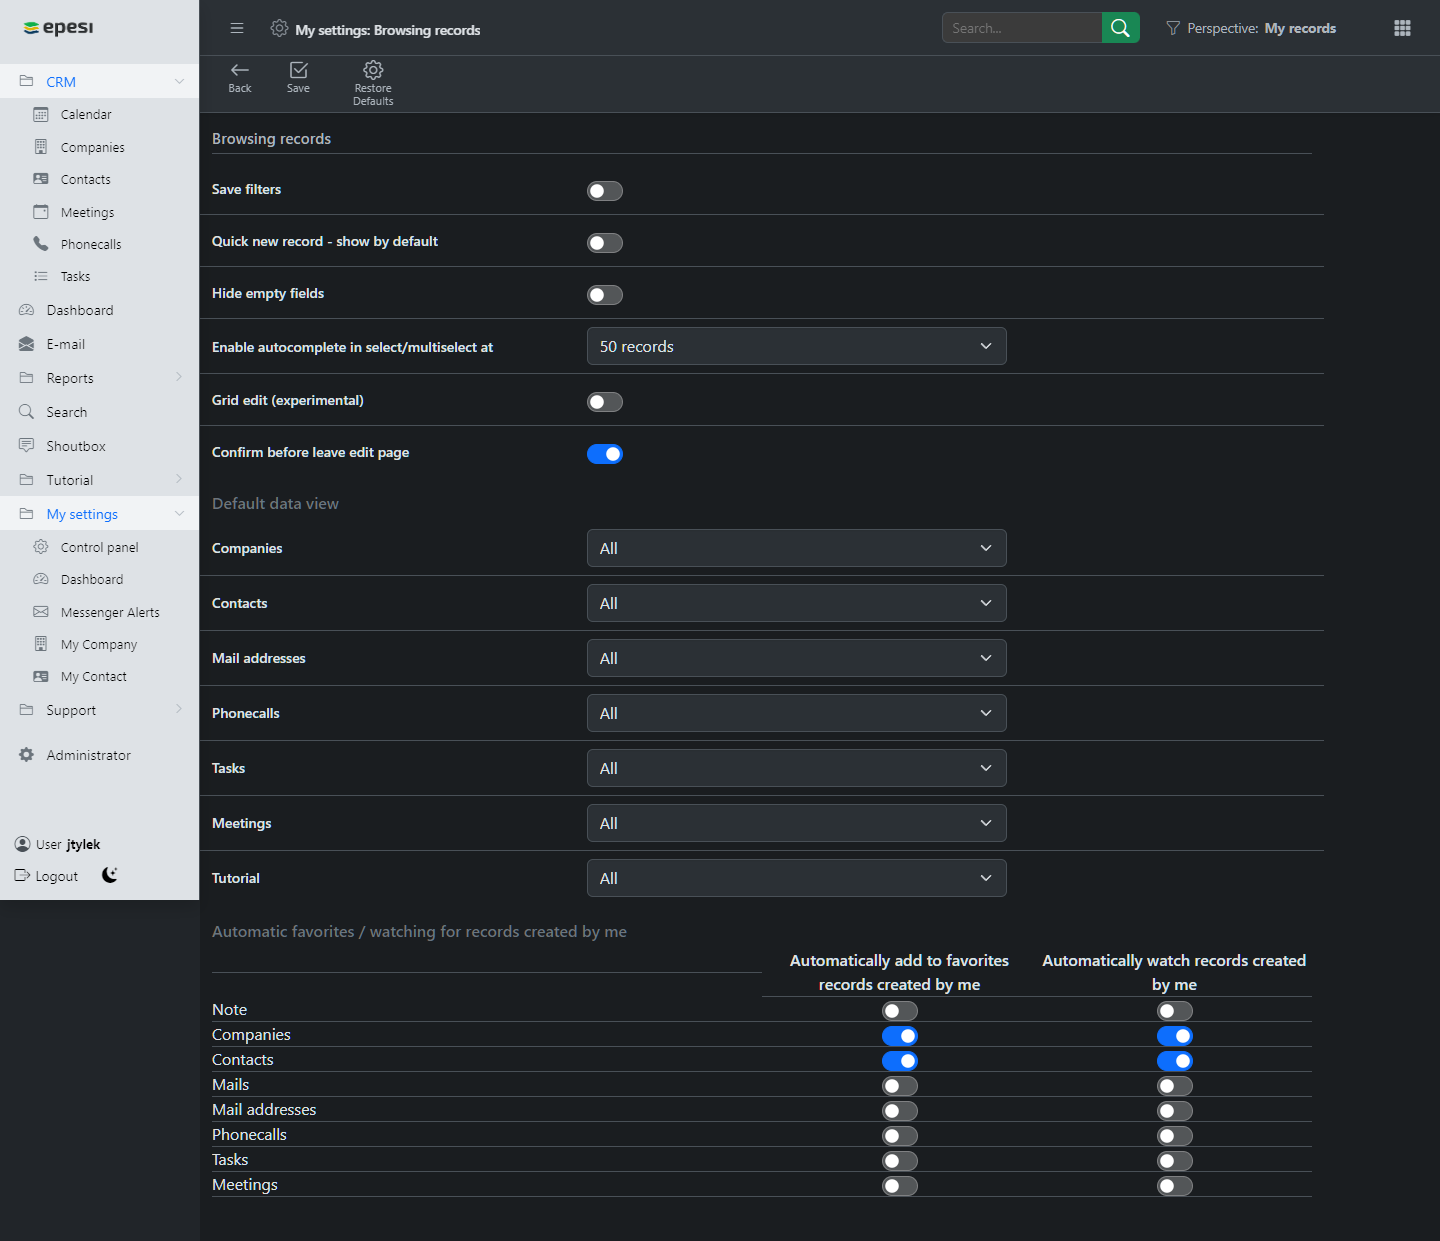
- Quick new record — show by default — when enabled, Add new record opens an inline empty row you can fill in directly while browsing, instead of a separate form. Faster, but limited to the fields shown in the browsing view.
- Hide empty fields — hides empty fields when viewing record details, so you only see what's filled in. All fields still show up while editing.
- Number of records that triggers autocomplete — select/autoselect fields with a lot of possible values switch from a dropdown list to an autocomplete search box once they pass this threshold, since a long list gets unwieldy.
- Grid edit — lets you edit some fields directly from the browsing view. Hover a field to reveal an edit icon if it's editable there.
- Default data view — sets whether each record type starts on All, Favorites, or Recent when you open it. Configurable per module; also changeable on the fly from the basic filter while browsing.
- Automatically adding your records to favorites — per record type, automatically favorite anything you create.
- Default filter for Companies Account Manager — whether Companies defaults to showing only records where you're the Account Manager, or all of them. Applies to browsing mode only, and can be reset there by clearing the corresponding filter.