"Hello World"
Tutorial
Every programmer tries the basic print "Hello World" example and we are going to do the same.

Unfortunately, this will not be as simple as in ATARI BASIC circa 1984
running on ATARI 800 XL - 8 bit computer with only 64kB of RAM:
10 PRINT "Hello World!"
RUN
Hello World
Today developing a web application is a little bit more complex.
Please note that in this tutorial we'll be creating a fully functional module in Epesi, which can be packaged and installed or uninstalled, but most importantly shared with other users via GitHub repository or Epesi Store. You can translate it into other languages, you can distribute it for free or sell for a profit - your own, custom version of Epesi BIM with your modules included, all for free under extremely flexible MIT license terms of this framework and application. This is the beauty and freedom of FOSS.
We tried to make the process of module creation as simple as possible when designing Epesi PHP Framework, which was used then to develop Epesi Business Information Manager, or Epesi BIM for short. This low level PHP framework allows agile approach to software development, rapid prototyping with low-code and no-code tools needed to build a modern, database driven Single Page Applications (SPA) like CRM or ERP systems, cloud native as we develop 100% for the web.
TECH TIP>
Basic knowledge of HTML and PHP required.
Familiarity with SQL and CSS is helpful.
This tutorial is for absolute beginners and wanna be developers!
Don't worry as you will be guided step by step.
It's easy. It's Epesi.
Epesi module requires 3 PHP files
The basic minimum for a functional Epesi module are three (3) simple PHP files named as follows: Main module filename should be Modulename_0.php, where 0 indicates the version of the module, as in the example below:
1 - Modulename_0.php – this is the main file of every module
2 - ModulenameCommon_0.php – this file consists of functions used by other modules
3 - ModulenameInstall.php – here we place code needed for the installation routine
All files needed by a module should be placed within a single directory named after a module, including CamelNotation, and ideally under Custom directory:
./epesi/module/CustomTECH TIP>
If you do not have a „Custom” folder please create one.
When naming your files and folders use CamelCase notation.
See more info here: https://epesi.org/devtutorial/creating-modules
Because our module will be called simply "Hello World" and we will place it in our own, custom directory of modules, then our path should be:
./epesi/modules/Custom/HelloWorld/Create these PHP files now.
The end result should look like this:
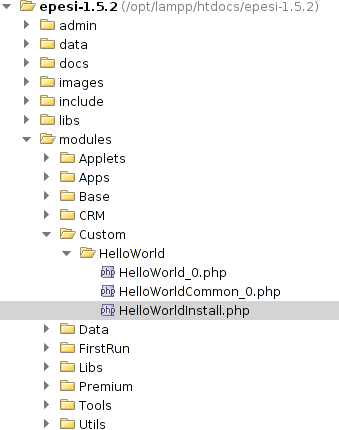
HelloWorld_0.php
This is the main file of any module which defines the class responsible for main view of the module.
<?php
    defined("_VALID_ACCESS") || die('Direct access forbidden'); // - security feature

    // - notice how the class name represents its path
    // - use CamelNotation_WithUnderscores for readibilty
    class Custom_HelloWorld extends Module {
       // - main view of the module follows
        public function body() {
         print('Hello World!');
        }
    }
 ?>
This class represents a bare minimum that is required.
For the class to be treated as a module it is important to inherit from class Module (extends Module).
The body function is where you place the content that is to be viewed.
The output of this module will be
Hello World!HelloWorldInstall.php
We must create an installation class for the module to get installed.
<?php
    defined("_VALID_ACCESS") || die('Direct access forbidden');

    class Custom_HelloWorldInstall extends ModuleInstall {

        public function install() {
            // Here you can place the installation process for the module
            return true; // Return true on success and false on failure
        }

        public function uninstall() {
            // Here you can place uninstallation process for the module
            return true; // Return true on success and false on failure
        }

        public function info() {
            // Returns basic information about the module which will be available in the epesi Main Setup
            return array( 'Author'=>'Place your name here',
                                'License'=>'<Place type of the license here>',
                                'Description'=>'<Place description here>');
        }

        public function simple_setup() {
            // Indicates if this module should be visible on the module list in Main Setup's simple view
            return array('package' => __('HelloWorld'), 'version'=>'0.1');
            // - now the module will be visible as "HelloWorld" in simple_view
        }

        public function requires($v) {
            // Returns list of modules and their versions, that are required to run this module
            return array();
        }

        public function version() {
            // Return version name of the module
            return array('0.1');
        }
    }
?>
Please note that our installation class Custom_HelloWorldInstall extends ModuleInstall.
There are many parameters and options that can be specified here, but for now let's leave it at this basic minimum.
HelloWorldCommon_0.php
This file should contain all the functions connected with the modules functionality and that can be called outside the module. i.e. to create a submenu for the module on the main page.
    <?php
    defined("_VALID_ACCESS") || die('Direct access forbidden');

    class Custom_HelloWorldCommon extends ModuleCommon {
        public static function menu() {
            return array(__('Module') => array('__submenu__' => 1, __('Hello World') => array()));
            // - this will output as Module->HelloWorld in the main menu
        }
    }
    ?>
Module Installation
Once all files are created we must install this module.
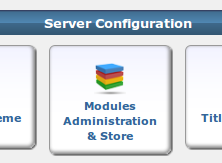
Open the administrator panel:

Under the "Server configuration" tab click "Modules administration & store".
Click on Rebuild modules database button in the Action Bar to scan modules directory for changes and to detect your newly created module "Hello World".

You will see a dialog box informing that it may take several minutes to scan for new modules.
Click OK.
After a while you should see your module ready for installation be under the "All" tab.
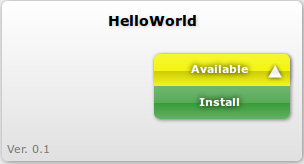
Click Available->Install to install your module.
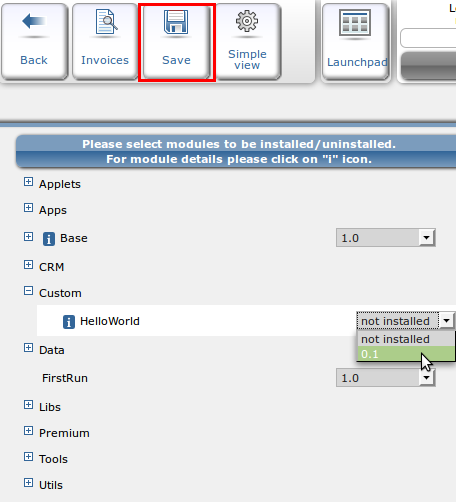
You could also install it from the advanced view by clicking Advanced view in the top menu.

Now change your module from "not installed" to "0.1" in the select menu and click save at the upper tab menu as shown below.
A dialog box will inform you that the package has been installed.
Refresh epesi by reloading the entire page in the browser (CTRL+F or F5).
Now you should be able to access your module in the menu under Module → Hello World.

If you have done everything right the page will print out „Hello World” at the top center of the page:
Hello Word!You just created your first module in EPESI.
Congratulations!
 Screenshot of Epesi BIM running a custom "Hello World!" module.