Campaign Manager
Before you start using Campaign Manager you must configure your settings (Administrator-Campaign Manager).

Aministrator - Campaign Manger
Settings
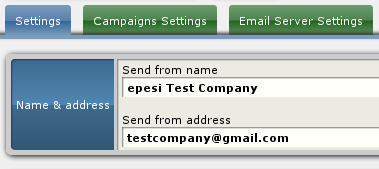
Name & address to be displayed as sender
‘Send from name’ will be displayed in the email title. ‘Send from address’ will be displayed as the email address to reply to.
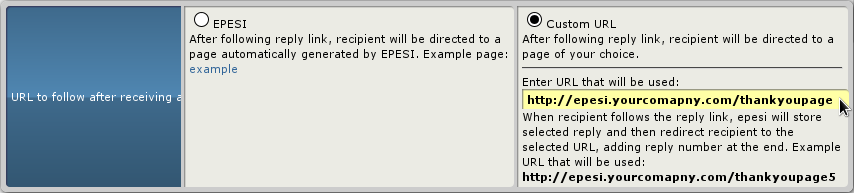
 URL to follow after receiving a reply
By default this will be check to EPESI. After replying to the email the recipient will be directed to the example page.
 You can choose ‘Custom URL’ to direct the user to a custom page.
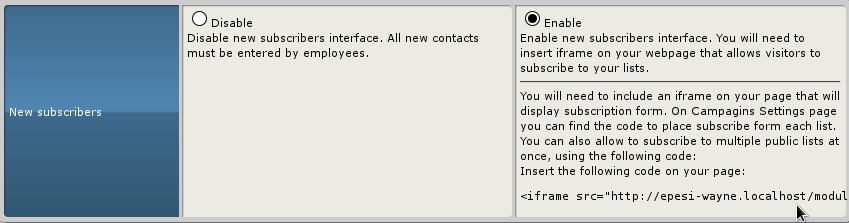
 New subscriber
Disabled by default - only employee can add new contacts to campaign list. However, if enabled allows users to subscribe by themselves. In the Campaings settings tab you will be provided with an iframe for every campaign list you have. Paste this iframe on your website for users to subscribe.
 Footer and subscription management
Choose the way you want subscriptions to be managed.
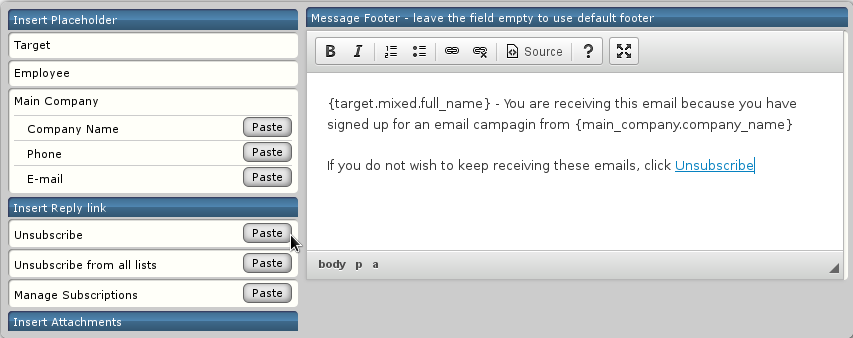
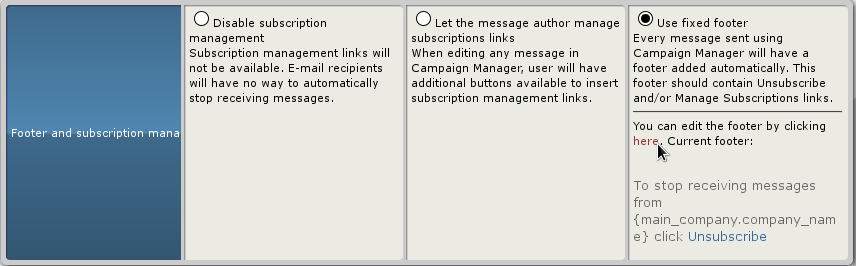 If you choose fixed footer click ‘here’ to change the footer.
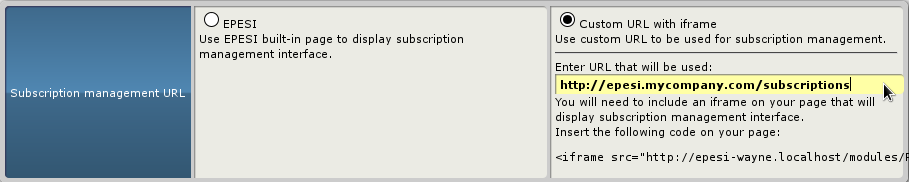
 Subscription management URL
By default subscription management interface will be displayed using EPESI’s built-in page. You can provide a custom url for this purpose.
 Tracking image management
If you wish to recieve notifications when recipients read your email leave this to enabled, otherwise check disabled.

Campaigns Settings
This tab is where you can manage all your campaigns. To make a campaign public, check public and provide a label.
 If you enabled subscription you will have an iframe field.

Email Server Settings
Server settings
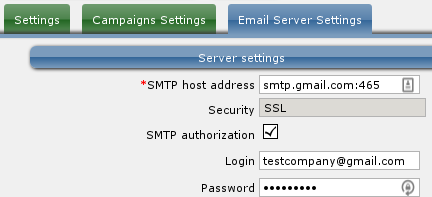
- SMTP host address - the smtp address your hosting has provided you with.
- Security - choose a security protocol your smtp uses (tls, ssl, self signed tls/ssl). Otherwise choose ‘none’.
- SMTP authorization - check if you use authorization for you smtp.
- Login - your smtp login.
- Password - your smtp password.
If you are not sure about any of these fields, contact your hosting provider.
Server limits
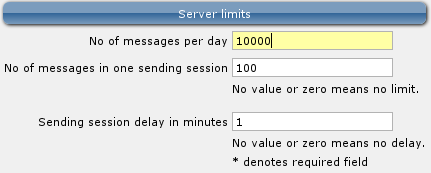
- No of messages per day - number of messages you want to be sent per day. No value or zero means no limit.
- No of messages in one sending session - number of messages you want to be sent in one session. No value or zero means no limit.
- Sending session delay in minutes - delay between sending sessions supplied in minutes. No value or zero means no delay.
Menu - CRM - Campaign Manager
List Campaigns
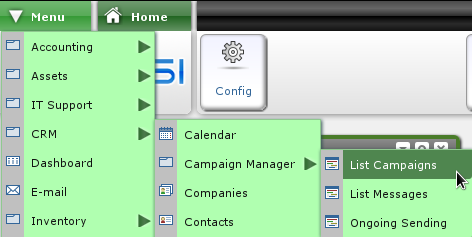 Campaign manager uses list manager to create campaign lists. Adding a campaign list is explained here
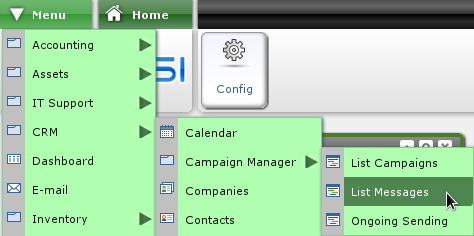
List messages
To view the list of campaign messages choose menu->crm->campaign manager->list messages. Click ‘New’ or ‘Add new’ to create a new message.


- Name - a short name describing the purpose of the message (up to 64 characters).
- List - a list from list manager of e-mail campaign type (crm->campaign manager->list campaigns).
- Date - date the message was created.
- Scheduled - The number of days after which the message will be sent. The message will be sent depending on the date we add the element to the list. If e.g. we set the schedule to 2 days the message wil be sent 2 days after adding the elements to the list. If after these two days we add new elements to the list the message will be sent 2 days after adding them to the list. Leave this field empty to send the messages manually.
- Sent to - email address to which the email campaign will be sent (the list).
- Message Subject - a short subject of the message (up to 64 characters).
- Message Body - full content of the message. From the right side menu you are provided with custom links (Insert reply link), attachments (Insert attachments) and placholders (Insert placeholder) that you can paste into the message. Types of placeholders:
- Target
- Full Name - full name of the contact to whom the email will be sent
- Short Name - short name of the contact to whom the email will be sent
- Phone - phone of the contact to whom the email will be sent
- E-mail - email of the contact to whom the email will be sent
- Employee
- First Name - your first name
- Last Name - your last name
- Work Phone - your work phone
- E-mail - your email
- Main company
- Comapny Name - your companies name
- Phone - your companies phone
- E-mail - your companies email
- Target
When your done just click ‘Save’.
Ongoing sending
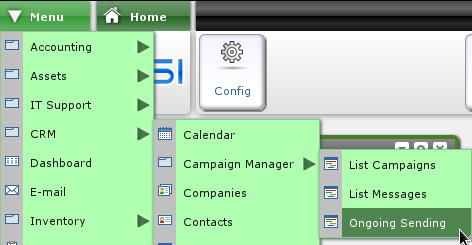 List of the campaigns that are being currently sent.
